Headlight Adjustment: A DIY Guide

To ensure good visibility at night and prevent dazzling drivers in oncoming traffic, your car's headlights must be correctly adjusted.
Self-service headlight adjustment is performed in several stages:
- vehicle preparation (tyre pressure, load);
- marking the wall;
- adjusting the dipped beam;
- adjusting the main beam and fog lights.
Adjustment can be done manually using a flat wall and a tape measure, or on a stand at a service centre.
When to adjust headlights
The procedure is carried out in the following cases:
Examples of when headlight adjustment is necessary
- When replacing bulbs (especially if the bulb type changes).
- When replacing one or both headlights (after an accident or modifications).
- If drivers of oncoming cars flash their main beams at you, signalling that they are being dazzled.
- When installing fog lights.
- After suspension work that affects ride height (replacing springs, struts).
- When changing to wheels or tyres of a different diameter.
- Before an MOT test (vehicle inspection).
- Before long journeys.
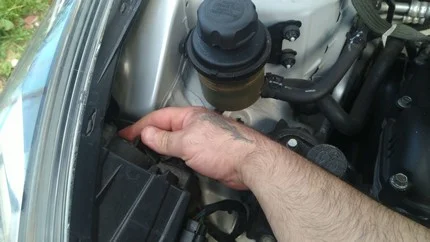
Preparation for adjustment
Before starting to mark the wall, be sure to check the following parameters:

Universal guide to headlight adjustment
- Equal tyre pressure (according to the car manual).
- Suspension condition (the car must not be tilted).
- Load: a full tank of fuel and a person in the driver's seat (or a weight of equivalent mass).
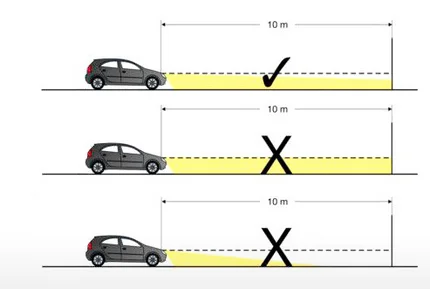
Adjustment requires a flat vertical wall and a level surface 7–10 metres long in front of it. If the ground is uneven, the lighting angle will be set incorrectly.
Markings can be made with chalk or masking tape. For accuracy, it is recommended to use a laser level.
Marking scheme for dipped beam

How to adjust headlights without equipment
Drive close to the wall and mark the centre of the car and the centres of both bulbs with vertical lines. Then reverse to the distance specified in the manual (usually 5 or 7.5 metres).
To mark the wall correctly, you need to:
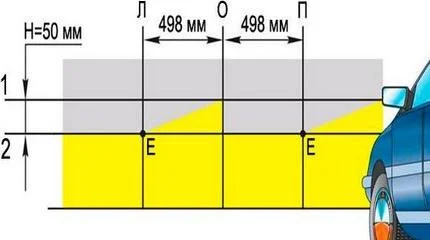
- Measure the distance from the floor to the centre of the lamp on the car and draw a horizontal line on the wall at this height (Line H1).
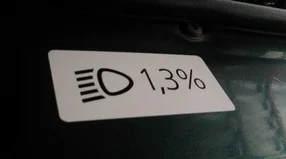
- Draw the cut-off line (beam pattern limit) below it (Line H2). The distance between them depends on the headlight inclination angle.
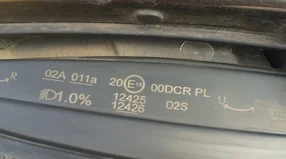
Calculation formula: Distance to wall (m) × Inclination percentage = Drop (cm).
Example: If you are standing 7.5 metres from the wall and the headlight says 1%, the light line should be 7.5 cm lower than the centre of the lamps (7.5 m × 0.01).
Inclination angle on Lada Priora (1.2%)
Correction angle VAZ 2105
Headlight inclination angle Kia Cerato (1.0%)
- Position the car at the selected distance from the wall (e.g., 7.5 metres).
- Switch on the dipped beam. Cover one headlight with a thick cloth or cardboard and adjust the other.
Headlight adjustment scheme
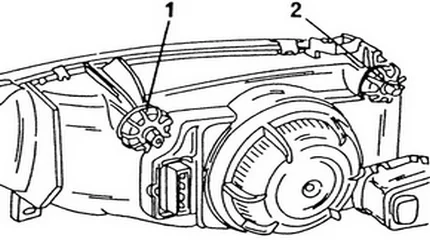
Adjustment screws for setting the headlight beam
Adjustment process:
- By turning the adjustment screws (located on the back of the headlight unit), align the horizontal cut-off line with the lower marking line.
- The angle where the light kicks up (the "tick" shape) should align with the vertical mark for the centre of that headlight.
If the vehicle has combined main and dipped beams (single H4 bulb), the dipped beam is adjusted, and the main beam will automatically align correctly. If the optics are separate, the main beam is adjusted separately: its beam should be centred strictly on the upper marks (at the height of the actual centre of the headlights).
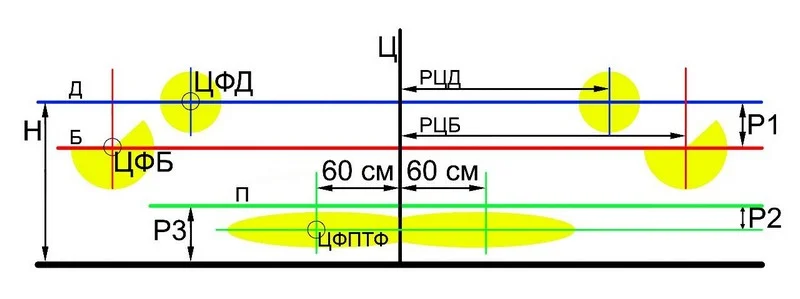
C — central axis of the vehicle; D — line of headlight centres; B — dipped beam adjustment line (lower than D by the inclination amount);
Adjusting Fog Lights
Setting up fog lights is critical for safety. Fog lights do not have a distinct "kick-up" pattern but have a clear upper cut-off line. If you aim them too high, you will severely dazzle oncoming drivers because fog lights have a wide beam spread.
The car must be loaded (full tank + driver). The distance to the wall is usually 5 or 10 metres.

Fog light adjustment scheme
Procedure:
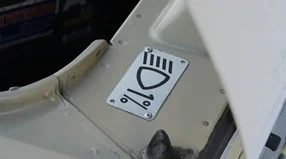
- Measure the height from the ground to the centre of the fog light.
- Draw a horizontal line on the wall below this level. The drop for fog lights is usually greater than for headlights (often 2% or 4%). For example: with a 2% slope and a distance of 5 metres, the line should be 10 cm below the centre of the light.
- Using the adjustment screw on the fog light, align the upper edge of the light beam with this lower line.
Adjusting Projector (Lens) Headlights
How to improve headlight output with lenses: video
Projector optics (both halogen and Xenon/LED) are characterised by a sharper cut-off line shaped like a "step". Contrary to myths, lenses are adjusted in the same way as standard reflector headlights — using the adjustment screws on the headlight housing.
Marking the wall follows the same principle (taking into account the inclination percentage indicated on the headlight). The main difference is the higher precision of adjustment due to the sharp boundary between light and shadow. You need to align the horizontal shelf of the "step" with the marking line.
Headlight adjustment using a device
At service centres, headlights are adjusted using a beam setter (regloscope). This ensures maximum accuracy. Knowing the algorithm will help you check the technician's work:

Headlight adjustment using a beam setter
- The device must be positioned strictly parallel to the front of the vehicle (using a mirror or laser on the device).
- The optical chamber of the device is levelled horizontally and centred relative to the headlight.
- The inclination angle is set on the device scale (e.g., 1% or 1.2%), corresponding to the marking on your headlight.
- The technician turns the screws until the light boundary on the device's screen aligns with the control line.
Remember that correctly adjusted lighting is essential for your safety. Headlights aimed too high do not illuminate the road but rather shine into the eyes of oncoming drivers, reducing the effectiveness of road illumination.
Was this article useful?
Your feedback helps us improve our content.
Related Materials


Discussion (0)
No comments yet!