Battery Electrolyte Density
Electrolyte density (specific gravity) is a crucial parameter for all lead-acid batteries. Every car owner should know what the correct density is, how to check it, and, most importantly, how to correctly increase the electrolyte density (specific gravity of the acid) in each cell filled with the H2SO4 solution.

Checking the density is part of the standard battery maintenance process, which also includes checking the electrolyte level and measuring the battery voltage. In lead-acid batteries, density is measured in g/cm³. It is proportional to the solution's concentration and inversely proportional to the liquid's temperature (the higher the temperature, the lower the density).
You can determine the battery's condition by the electrolyte density. Therefore, if the battery does not hold a charge, you should check the state of the liquid in every cell.
Electrolyte density affects the battery capacity and its service life.
It is checked with a hydrometer (densimeter) at a temperature of +25°C. If the temperature differs from the requirement, corrections are applied to the readings, as shown in the table.

So, we have clarified what it is and that regular checks are necessary. But what figures should you aim for? What is good, what is bad, and what should the battery electrolyte density be?
What the Battery Density Should Be
Maintaining the optimal electrolyte density is vital for the battery, and it is worth noting that the necessary values depend on the climatic zone. Therefore, the battery density should be set based on a combination of requirements and operating conditions. For example, in a moderate climate, the electrolyte density should be at the level of 1.25–1.27 g/cm³ ±0.01 g/cm³. In colder zones, with winters down to -30 degrees, it should be 0.01 g/cm³ higher, and in hot subtropical areas — 0.01 g/cm³ lower. In regions where the winter is particularly harsh (down to -50°C), to prevent the battery from freezing, it is necessary to increase the density from 1.27 to 1.29 g/cm³.
Many car owners ask: "What should the electrolyte density be in winter versus summer, or is there no difference, and should the indicators be kept at the same level all year round?" Let's examine this in more detail, aided by the battery electrolyte density table separated by climatic zones.

Also, remember that a battery installed in a vehicle is typically charged to no more than 80–90% of its nominal capacity, so the electrolyte density will be slightly lower than at full charge. Therefore, the required value is chosen slightly higher than that indicated in the density table, so that when the air temperature drops to freezing levels, the battery remains operational and does not freeze in winter. However, regarding the summer season, excessively high density can threaten gassing (boiling).
Battery Electrolyte Density Table
The density table is compiled relative to the average monthly temperature in January. Climatic zones with cold air down to -30°C and moderate ones with temperatures not lower than -15°C do not require lowering or raising the acid concentration. All year round (winter and summer), you should not alter the electrolyte density, but merely check and ensure it does not deviate from the nominal value. However, in extremely cold zones, where the thermometer frequently drops below -30 degrees (down to -50), adjustment is permissible.

Battery Electrolyte Density in Winter
The electrolyte density in the battery in winter should be 1.27 g/cm³ (for regions with winter temperatures below -35°C, not less than 1.28 g/cm³). If the value is lower, it leads to a decrease in electromotive force and difficult engine starting in frost, potentially leading to the electrolyte freezing.
When the density in the battery is low in winter, do not rush to buy corrective fluid to raise it. It is much better to ensure a high-quality charge of the battery using a charger.
Short half-hour trips from home to work and back do not allow the electrolyte to warm up, and consequently, to charge properly, as the battery accepts a charge effectively only after warming up. Thus, the state of charge decreases day by day, and as a result, the density drops.
For a new and serviceable battery, the normal interval of electrolyte density change (full discharge – full charge) is 0.15–0.16 g/cm³.
Remember that operating a discharged battery at sub-zero temperatures leads to the electrolyte freezing and the destruction of the lead plates!
Using the table of electrolyte freezing point dependence on its density, you can find the sub-zero threshold at which ice forms in your battery.
g/cm³ | 1.10 | 1.11 | 1.12 | 1.13 | 1.14 | 1.15 | 1.16 | 1.17 | 1.18 | 1.19 | 1.20 | 1.21 | 1.22 | 1.23 | 1.24 | 1.25 | 1.28 |
°C | -8 | -9 | -10 | -12 | -14 | -16 | -18 | -20 | -22 | -25 | -28 | -34 | -40 | -45 | -50 | -54 | -74 |
As you can see, at 100% charge, the battery will freeze at -70°C. At 40% charge, it freezes at -25°C. A 10% charge will not only fail to start the engine on a frosty day but will also freeze solid in -10 degree frost.
When the electrolyte density is unknown, the degree of discharge is checked with a load tester. The voltage difference in the cells of one battery should not exceed 0.2V.
Load Tester Voltmeter Reading, V | Battery Discharge Level, % |
1.8–1.7 | 0 |
1.7–1.6 | 25 |
1.6–1.5 | 50 |
1.5–1.4 | 75 |
1.4–1.3 | 100 |
If the battery has discharged by more than 50% in winter and more than 25% in summer, it must be recharged.
Battery Electrolyte Density in Summer
In summer, the battery suffers from dehydration. Given that high density affects lead plates negatively, it is better if it is 0.02 g/cm³ lower than the standard value (especially for southern regions).
In summertime, the temperature under the bonnet, where the battery is usually located, is significantly elevated. Such conditions promote the evaporation of water from the acid and increase the activity of electrochemical processes in the battery, ensuring high current output even at the minimum allowable electrolyte density (1.22 g/cm³ for warm, humid climate zones). Thus, when the electrolyte level gradually falls, its density increases, accelerating the corrosion of the electrodes. That is why it is so important to control the fluid level in the battery and add distilled water if it drops; failure to do so threatens overcharging and sulfation.
If the battery has discharged due to driver negligence or other reasons, you should try to restore it to working order using a charger. But before charging the battery, check the level and, if necessary, top up with distilled water that may have evaporated during operation.
Over time, the electrolyte density in the battery decreases due to constant dilution with distillate, dropping below the required value. Battery operation then becomes impossible, creating a need to increase the electrolyte density. But to know how much to increase it, you need to know how to check this density.
How to Check Battery Density
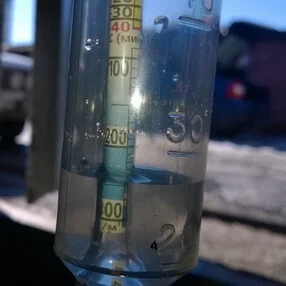
To ensure proper battery operation, electrolyte density should be checked every 15,000–20,000 km. Density measurement is carried out using a device called a hydrometer. This device consists of a glass tube containing a float (the hydrometer proper), with a rubber tip on one end and a suction bulb on the other. To perform a check, you will need to: open the battery cell plug, immerse the tip in the solution, and use the bulb to draw in a small amount of electrolyte. The floating scale will show the necessary information. We will look at how to correctly check battery density in more detail below, as there is also a type of battery known as maintenance-free, where the procedure differs slightly — you won't need any devices at all.
Density indicator on a maintenance-free battery
The density of a maintenance-free battery is displayed by a colour indicator in a special window (often called a "Magic Eye"). A green indicator signifies that everything is normal (charge level within 65–100%); if the density has dropped and charging is required, the indicator will be black. When a white or clear/red light appears in the window, urgent topping up with distilled water is needed (if possible) or the battery needs replacing. However, precise information about the meaning of each colour is found on the battery label.
Now let's continue to understand how to check the electrolyte density of a standard lead-acid battery at home.
Checking electrolyte density in a battery
To correctly check the electrolyte density, first, verify the level and correct it if necessary. Then charge the battery and proceed to the check, but not immediately; wait for a couple of hours of rest, as data will be unreliable immediately after charging or topping up water.
Remember that density depends directly on air temperature, so consult the correction table discussed above. After drawing fluid from the battery cell, hold the device at eye level – the hydrometer float must be at rest, floating in the liquid without touching the walls. Measurement is performed in each cell, and all readings are recorded.
Table for determining battery charge by electrolyte density.
Temperature | Charge Level | ||
100% | 70% | Discharged | |
Above +25°C | 1.21 — 1.23 | 1.17 — 1.19 | 1.05 — 1.07 |
Below +25°C | 1.27 — 1.29 | 1.23 — 1.25 | 1.11 — 1.13 |
Dependence of density on voltage according to charge state
Significantly reduced density in one of the cells indicates defects (specifically, a short circuit between plates). However, if it is low in all cells, this indicates deep discharge, sulfation, or simply aging. Checking the density combined with measuring voltage under load and without it will allow you to establish the exact cause of the fault.
When you need to check the electrolyte density to determine the battery's state of charge, you can do this without removing the battery from under the bonnet; you will need the instrument itself, a multimeter (to measure voltage), and a table correlating the measurement data.
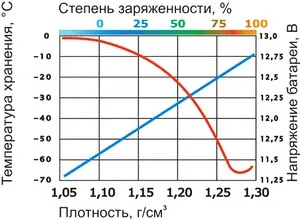
State of Charge | Electrolyte Density | Battery Voltage V (***) |
100% | 1.28 | 12.7 |
80% | 1.245 | 12.5 |
60% | 1.21 | 12.3 |
40% | 1.175 | 12.1 |
20% | 1.14 | 11.9 |
0% | 1.10 | 11.7 |
If necessary, density correction is performed. You will need to extract a certain volume of electrolyte from the battery and add corrective electrolyte (1.40 g/cm³) or distilled water, followed by a 30-minute charge at nominal current and a waiting period of several hours to equalize the density in all compartments. We will discuss how to correctly increase battery density next.
How to Increase Battery Density
Increasing density is necessary when you have had to adjust the level repeatedly with distillate, or if it is insufficient for winter operation, and also after repeated prolonged overcharging. A symptom of the need for such a procedure is a shortened charge/discharge interval. Apart from correctly and fully charging the battery, there are a couple of ways to increase density:
- Add more concentrated electrolyte (so-called corrective electrolyte);
- Add acid.

How to correctly check and increase battery density.
To increase and correct the electrolyte density in the battery, you will need:
1) A hydrometer;
2) A measuring cup;
3) A container for mixing new electrolyte;
4) A suction bulb;
5) Corrective electrolyte or acid;
6) Distilled water.
The procedure is as follows:
- A small volume of electrolyte is withdrawn from the battery cell.
- Instead of that amount, we add corrective electrolyte if density needs to be raised, or distilled water (density 1.00 g/cm³) if it needs to be lowered.
- Next, the battery must be placed on charge for half an hour at nominal current — this allows the liquids to mix.
- After disconnecting the battery from the charger, wait at least another hour or two for the density to equalize in all cells, the temperature to drop, and all gas bubbles to escape, to exclude errors during the control measurement.
- Re-check the electrolyte density and, if necessary, repeat the procedure of withdrawing and adding the required liquid (to further raise or lower), reducing the dilution step, and then measure again.
To understand how to raise the density in the battery, or perhaps lower it in a specific cell, it is desirable to know its nominal volume in cubic centimetres. For example, the volume of electrolyte in one cell of a standard 55 Ah car battery is approx 633 cm³, and for a 45 Ah one — 500 cm³. The composition proportion of the electrolyte is approximately: sulphuric acid (40%); distilled water (60%). The table below will help achieve the required battery electrolyte density:

electrolyte density calculation formula
Note that this table provides for the use of corrective electrolyte with a density of only 1.40 g/cm³; if the liquid has a different density, an additional formula must be used.
For those who find such calculations too complex, you can do it somewhat simply by using an iterative method:
Draw out the majority of the liquid from the battery cell and pour it into a measuring cup to determine the volume, then top up half of that amount with electrolyte and rock gently to mix. If you are still far from the required value, top up again with electrolyte, using a quarter of the volume previously extracted. Continue adding in this manner, halving the amount each time, until the goal is achieved.
How to Increase Battery Density If It Has Fallen Below 1.18
When the electrolyte density is less than 1.18 g/cm³, electrolyte alone will not suffice; you will have to add acid (1.8 g/cm³). The process is performed according to the same scheme as adding electrolyte, only the dilution step should be small, as the density is very high and you can overshoot the desired mark on the first dilution.
The average service life of modern batteries, provided operating rules are followed (avoiding deep discharges and overcharging, including due to a faulty voltage regulator), is 4–5 years. Therefore, performing manipulations such as drilling the casing, turning it over to drain all fluid and fully replacing it, makes no sense — it is futile nonsense. If the plates have crumbled, nothing can be done. Monitor the charge, check the density on time, service the car battery correctly, and its maximum service life will be ensured.
Was this article useful?
Your feedback helps us improve our content.
Related Materials


Discussion (0)
No comments yet!