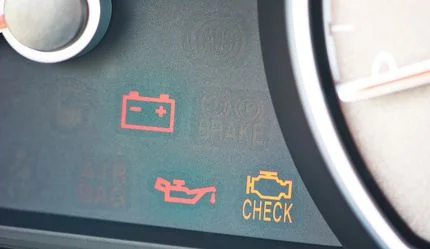
Battery Charging Warning Light Is On
The battery charging warning light is on — this usually means the alternator is not working. This is the first thought an improperly charging vehicle owner has when they see the battery icon on the dashboard. However, the reason the charge indicator illuminates is often much simpler — such as a loose drive belt or a poor electrical contact. It is also possible that the alternator will need dismantling, as brush wear or a diode bridge failure could be the culprit.
The first thing to do if the battery charge light is on while the engine is running is to check the voltage at the battery terminals. This is necessary to determine the location of the repair — either in the engine bay or in the vehicle's dashboard.
| Situation when the fault occurs | Component causing the fault | Possible causes of failure |
|---|---|---|
| Battery light is on at ignition | - | At the moment of starting the engine (switching on the ignition), the battery warning light should illuminate for 1...2 seconds and then extinguish. If it continues to stay lit, further diagnostics are required. |
| Battery light does not go out | Alternator |
|
| Battery |
| |
| Battery charge light flickers or comes on periodically | Alternator |
|
| Charge light glows dimly | Wiring |
|
| Alternator |
| |
| Battery light flashes | Alternator |
|
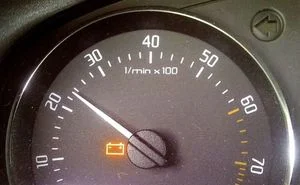
| Battery light is on at idle (low RPM) | Alternator |
|
| Battery |
| |
| Battery light is on but goes out after revving | Alternator |
|
| Warning Lamp | Use of LED bulbs instead of incandescent bulbs in vehicles designed specifically for incandescent bulbs. | |
| Battery light comes on while driving | Alternator |
|
| Battery | Partial or complete failure of the battery, or critical discharge. | |
| Battery light is on when cold | Alternator |
|
| Light is on but charging is present | Alternator |
|
| Warning Lamp |
| |
| Battery |
|
Reasons why the battery charge light is on
In a healthy electrical system, the battery warning light on the dashboard illuminates only when the engine is starting, and extinguishes after one or two seconds. If this does not happen, or if the icon activates while the engine is idling or whilst driving, it is a sign of a fault, and you need to find the reason why the battery control light is illuminated.
Alternator
Most commonly, the battery light stays on if the alternator fails to transmit energy to the battery after the engine has started. This happens when the following problems occur:

- Loose belt tension. Or a critical situation — a snapped belt. In this case, the belt will slip on the pulley, preventing the alternator pulley from rotating at the required angular speed and, consequently, generating electricity with sufficient voltage to charge the battery properly. Another variation of belt slippage is contamination of its inner surface and/or the alternator pulley surface. In such situations, a squealing noise from under the bonnet is often heard in cold weather.
- Brush wear. Over time, alternator brushes wear down naturally, leading to low voltage generation.
- Voltage regulator faults. The task of this component is to limit the voltage transmitted from the alternator to the battery. If the regulator fails, voltage is usually not transmitted to the battery at all, resulting in the battery light illuminating on the dashboard.
- Diode bridge. Its function is to convert the alternating current (AC) generated by the alternator into direct current (DC). Accordingly, if it fails, the alternator will not charge the battery.
- Alternator pulley bearing faults. With significant wear (or excessive belt tension), significant bearing play or seizing can occur. This usually leads to belt slippage with the consequences described above.
- Poor contact on the alternator. Although the terminal connection where the alternator output wires converge is mechanically protected (usually by a cap or similar device), contacts can often oxidise over time, or become contaminated with dirt and/or oil. All this leads to reduced conductivity. Similar reasoning applies to the earth contacts. If the earth connection is poor, the battery will not receive the proper charge, and the battery icon will light up on the dashboard.
- Break in one of the alternator winding phases (open circuit). Typically, this happens with contacts connected via a bolt. Specifically, the bolt may loosen over time, causing a break in contact between one of the phases and the diode rectifier. An open circuit is also possible if both power diodes on the rectifier block fail. Note that in this case, the battery warning light on the dashboard will glow at half-intensity. It usually stops glowing when engine RPM is increased.
Battery
The battery icon on the dashboard lights up when the battery simply cannot accept a charge. The primary reason for this is the age of the battery or its partial failure. Another possibility is a low electrolyte level. A secondary reason is oxidation of the terminals and incoming contacts or surface contamination.
Warning Lamp
On many older vehicles (for example, the Lada Samara family), an incandescent bulb is used as the battery warning light. On these models, it is possible to change this bulb by dismantling the instrument cluster.
Some car owners inexperiencedly install an LED bulb instead of an incandescent one. This results in the light remaining illuminated after starting the engine and idling (at a voltage of just over 12 Volts). However, if you forcibly raise the engine speed to approximately 2000 RPM, the battery light extinguishes.
Wiring
Often, the cause of incorrect battery light operation is damaged wiring. For instance, when the light glows dimly in various situations. For example, the wire running from the battery to the alternator. Specifically, there are known cases where a damaged wire (break, insulation damage) causes the lamp to glow slightly even with a minor load on the battery.
Similarly, the battery light may glow at half-intensity due to poor contact at the voltage regulator. Poor contact can be caused by corrosion or mechanical damage.
Diagnostics and Repair
In a situation where the red battery icon is illuminated with the engine running, you must first verify whether the battery is truly not receiving a charge or if the light is on but charging is actually occurring.
On the road, without a multimeter at hand, this can be determined visually. In the dark, if the car is running solely on the battery, the headlights, dashboard illumination, and interior lights will eventually begin to dim.
Previously, a so-called "old-school" method of testing the alternator by disconnecting the battery terminal was popular, but for modern cars, this is dangerous:
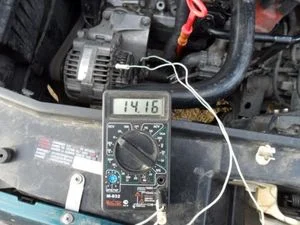
For a safe and detailed check, you will need a multimeter capable of measuring DC voltage. The algorithm is as follows:
- Check the condition and tension of the alternator drive belt. The tension force should be such that you can manually twist it 90° (set it vertically), but no more. Additionally, the belt must be dry, and its surface free of moisture and service fluids.
- Check the battery voltage in a static state. After stopping the engine, the value should be around 12...13 Volts. If the voltage is lower, check the alternator.
- Measure the voltage at idle speed. To do this, warm up the car and measure the voltage at the terminals. Its value should be within the range of 13.8...14.5 Volts. If less — undercharging; if higher — overcharging.
- Increase engine speed to 2000...3000 RPM. Ensure that the battery voltage does not increase significantly (does not exceed 14.5 Volts). Otherwise, check the voltage regulator.
- With the engine idling, switch on consumers — high beam headlights, rear window heater, radio. The battery voltage should not drop below 13.8 Volts.
If, during testing, the battery voltage is within the described limits but the light remains on, this indicates a false alarm, and diagnostics of the vehicle's electrical system — the sensor and instrument cluster — are required. If measurements show the battery voltage is around 12.6...12.7 Volts and falling, the battery is indeed not charging. In this case, you must check all connection terminals on the battery and alternator, and perform additional diagnostics.
Alternator Brushes
To verify the functionality of the alternator brushes, the unit must be removed and disassembled. Specifically, remove the brush assembly and visually inspect it. Wear will be visible to the naked eye. Also, with brush wear, traces of arcing are often visible on the assembly. If necessary, replace worn brushes with new ones.
Voltage Regulator
The voltage regulator can fail for various reasons — a short circuit in the circuit, mechanical damage, natural wear, or incorrect connection to the battery terminals. To test the voltage regulator, you will need an electronic multimeter. The check itself is not difficult.
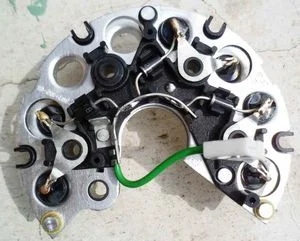
Diode Bridge
The diode bridge can be checked independently using a multimeter. Let's look at the testing algorithm using a common alternator design (e.g., type 37.3701 used in older Lada models) as an example; the principle is similar for other models. First, ensure there is no short circuit in the circuit:
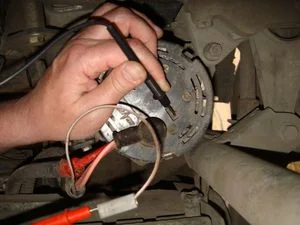
- Set the electronic multimeter to resistance measurement mode (ohmmeter).
- Place one multimeter probe on terminal 30 of the alternator and the other on the alternator housing (casing).
- If the diode bridge is intact, the resistance reading should tend towards infinity.
Next, check the positive diodes for a "breakdown". The procedure is as follows:
- Place one probe on terminal 30 on the alternator.
- Place the second multimeter probe on one of the diode bridge mounting bolts.
- If the diodes are intact, the resistance value will tend towards infinity.
Checking negative diodes for a "breakdown":
- Place one multimeter probe on one of the diode bridge mounting bolts.
- Place the second probe on the alternator housing.
- If the diodes are sound, the resistance tends towards infinity.
Checking auxiliary diodes:
- Place one probe on terminal 61 of the alternator.
- Place the second probe on one of the diode bridge mounting bolts.
- If the diodes are working correctly, the resistance value will tend towards infinity.
Bearing Faults
A damaged pulley bearing can lead to unbalancing or jamming. In the first instance, the belt will be "eaten away" and will wear out. In the second instance, the alternator shaft simply will not rotate or will seize. In any case, the bearing (or pulley) must be replaced.
As for the tensioner pulley bearing, the roller is usually replaced entirely with a new one.
Poor Contact on the Alternator
You need to inspect the positive output contact of the vehicle's alternator. There should be no traces of corrosion, oil, various automotive fluids, dust, or dirt. Accordingly, all contacts must be cleaned. The same applies to the earth connection. Check the quality of the contacts there. It is also advisable to grease closed contacts with a special protective grease.
Alternator Circuit Break
In the event of a break in one of the alternator phases or failure of power diodes, after removing the unit, perform the following diagnostic measures:
- Check the bolted connections of the alternator phase outputs to the diode bridge. Most often, corrosion is present on one of the contacts, or a bolt is loose (unscrewed), or there may be contamination. Accordingly, it is necessary to inspect not only the damaged contact but also other similar contacts for preventative purposes. If there is a wire break, you can try to replace it, but this depends on the specific situation. Often in such cases (or in case of insulation damage), the wires (winding) are replaced with new ones. Or the alternator is replaced entirely.
- Identify damaged power diodes and replace them (change the diode bridge). Sometimes a situation arises where the soldering on the diodes is compromised. In this case, the diodes are re-soldered.
- Check the stator winding for darkening of the turns. At the same time, it makes sense to check the integrity of the insulation visually and with a multimeter by checking the insulation resistance value. If there are dark spots on the wire insulation, this means the alternator is significantly worn, and it is better to replace such a winding with a new one (rewind it).
Improve Contact
In case of wiring damage from the alternator to the battery, perform an inspection and replace the wire with a new one if necessary. In parallel with this, it is mandatory to clean all contacts on both the alternator and the battery (terminals). It is necessary to clean the contacts of the diode bridge on the alternator and its positive output contact.
If the contact areas of the alternator brushes have oxidised, they should also be cleaned. At the same time, ensure that graphite from the brushes does not spread to other alternator elements. If the brushes are worn out, they must be replaced. Sometimes it is sufficient to improve the contact of the voltage regulator.
Conclusion
If the battery charging light is on, but charging is present, it is necessary to perform a comprehensive check of the battery, alternator, as well as fuses, the bulb, and wiring. Statistically, the most common cause of this fault is wear of the alternator brushes or problems with its contacts. Diode bridge failure occurs less frequently.
The following questions are also frequently asked:
- Battery charge light comes on and goes off randomly
- Charge light is on, but charging is occurring
- Battery charge light is on at idle
Was this article useful?
Your feedback helps us improve our content.
Related Materials


Discussion (0)
No comments yet!