Oxygen Sensor Malfunction
An oxygen sensor malfunction leads to increased fuel consumption, reduced vehicle dynamics, unstable engine operation at idle, and increased exhaust toxicity. Common causes of oxygen concentration sensor failure include mechanical damage, electrical (signal) circuit breaks, or contamination of the sensitive part of the sensor with fuel combustion products. In some cases, for example, when error codes P0130 or P0141 occur, the Check Engine warning light on the dashboard activates. It is possible to use the car with a faulty oxygen sensor, but this will lead to the problems mentioned above.
Purpose of the Oxygen Sensor
The oxygen sensor is installed in the exhaust manifold (the specific location and quantity may vary between different cars) and monitors the presence of oxygen in the exhaust gases. In the automotive industry, the Greek letter 'lambda' denotes the excess air ratio in the fuel-air mixture. For this reason, the oxygen sensor is often called a "lambda sensor" or "lambda probe".
Information provided by the sensor regarding the amount of oxygen in the exhaust gases is used by the electronic control unit (ECU) to adjust fuel injection. If there is a lot of oxygen in the exhaust, it means the fuel-air mixture supplied to the cylinders is lean (voltage at the sensor 0.1…0.3 Volts), and if there is little oxygen, it is rich (voltage at the sensor 0.6…0.9 Volts). Accordingly, the amount of fuel supplied is corrected. This affects not only engine dynamics but also the operation of the catalytic converter.
In most cases, the effective operating range of the catalytic converter is 14.6…14.8 parts of air to one part of fuel. This corresponds to a lambda value of one.
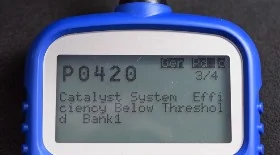
Some vehicles are designed to use two sensors. One is located before the catalytic converter, and the second is after. The task of the first is to correct the composition of the fuel-air mixture, whilst the task of the second is to check the efficiency of the catalytic converter. The sensors themselves are usually identical in construction.
Does the Lambda Sensor affect starting?
If the lambda sensor is disconnected, fuel consumption increases and exhaust toxicity rises; sometimes unstable engine operation at idle occurs. However, this effect only manifests after warming up, as the oxygen sensor begins to work at temperatures above +300°C. To speed up reaching the operating mode, its design includes a special heating element that turns on when the engine starts. Consequently, the signal from the lambda sensor is not taken into account immediately at the moment of engine start-up.
The "Check Engine" light illuminates during a lambda sensor malfunction when specific errors related to wiring damage or the sensor itself are generated in the ECU memory.
Symptoms of Oxygen Sensor Malfunction
A lambda sensor failure is generally accompanied by the following symptoms:

- Deterioration of traction and reduced vehicle dynamic characteristics.
- Unstable idle speed. Revolutions may fluctuate and drop below optimal levels. In critical cases, the car does not hold idle speed and stalls without using the throttle.
- Increased fuel consumption.
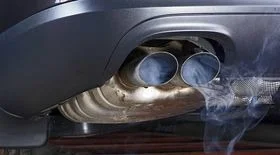
- Increased exhaust toxicity. The gases become opaque (greyish or bluish tint) and have a sharp smell of unburnt fuel.
These signs can also indicate other breakdowns. Therefore, to accurately determine an oxygen sensor fault, checks using a diagnostic scanner and a multimeter (to check the heating circuit and signal) are required.
Problems with the sensor wiring are usually recorded by the ECU. Errors formed include: P0136, P0130, P0135, P0141. In any case, it is necessary to check the sensor circuit (presence of voltage and integrity of wires), as well as look at the operation graph (oscillogram).
Causes of Oxygen Sensor Malfunction
The lifespan of a lambda sensor is about 100,000 km, however, there are factors that significantly shorten it:
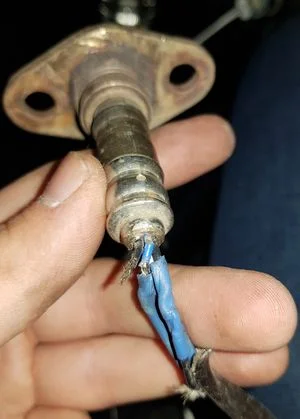
- Circuit malfunction. Breakage of power or signal wires, damage to the heating circuit. With a faulty heater, the sensor starts working with a long delay (only after being heated by exhaust gases). A short circuit is also possible.
- Internal sensor short circuit. In this case, it fails completely.
- Contamination of the sensitive element. Covered with soot or deposits from additives, the sensor stops responding correctly to the mixture composition (sensor "poisoning").
- Thermal overloads. Usually occur due to ignition problems when fuel burns in the manifold.
- Mechanical damage. Impacts when driving off-road or in accidents.
- Use of silicone sealants during installation, the vapours of which quickly destroy the sensor.
- Multiple failed attempts to start the engine (accumulation of fuel in the manifold).
- Contact of technical fluids (oil, coolant/antifreeze) with the ceramic tip.
Resource is significantly reduced by: wear of oil scraper rings, coolant getting into the oil, and an overly rich mixture.
How to Identify an Oxygen Sensor Malfunction
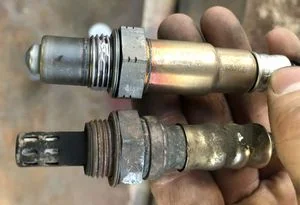
Visual Inspection and Multimeter Check
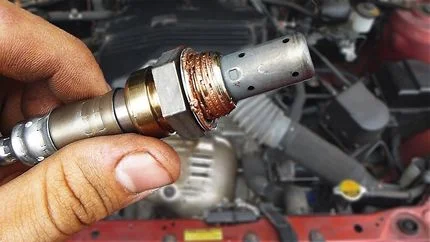
- Assess the amount of soot on the probe tube. If there is too much, the sensor is working incorrectly (reacting "slowly").
- Determine the colour of the deposits. White or grey deposits indicate additives in the fuel or oil. Shiny deposits indicate the presence of lead in the fuel — such a sensor must be replaced.
- Check the wiring integrity with a multimeter. Usually, the sensor has 4 wires: two for heating (white), one signal (black), and ground (grey). Colours may vary.
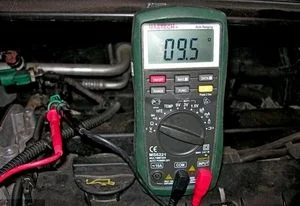
- Check the heater resistance. Disconnect the plug and measure the resistance between the heater wires. It should be within 2…14 Ohms (the exact value depends on the model). If the circuit is open (infinite resistance), the sensor is faulty and requires replacement.
- Check the power supply: at the connector on the ECU side, there should be voltage (usually 12V) on the heating contacts when the ignition is on.
How to check a lambda sensor video
Check with an Oscilloscope
An oscilloscope will show the sensor's operation most accurately. You can use a professional device or a laptop attachment. The main condition is a warmed-up engine.
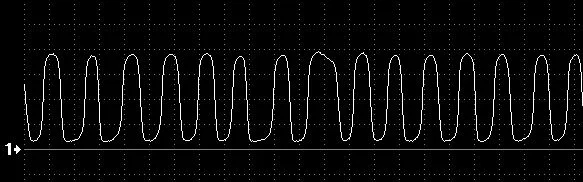
Graph of correct oxygen sensor operation
With a working sensor, the voltage should constantly change from 0.1 to 0.9 V. The graph looks like a smooth sine wave with a switching frequency of at least once per second at idle.
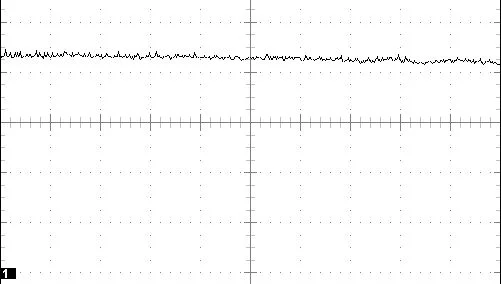
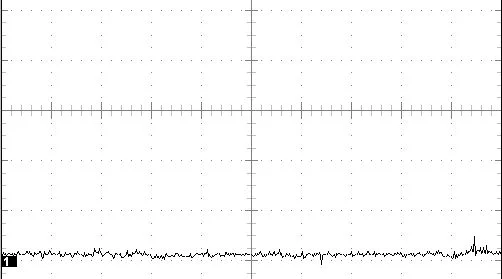
Graph of a heavily contaminated oxygen sensor (slow reaction)
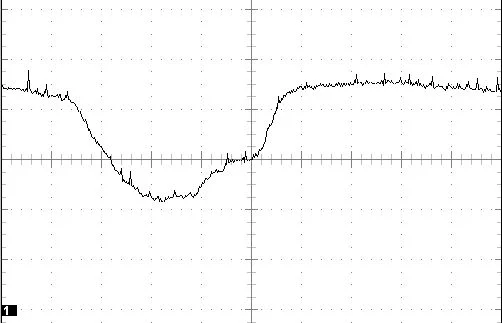
Graph of sensor operation on a lean mixture
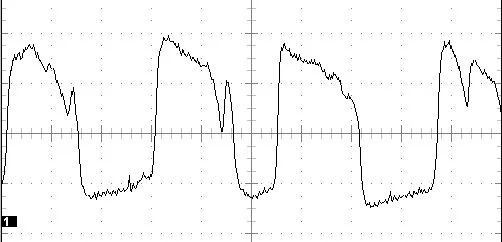
Graph of sensor operation on a rich mixture
Graph of sensor operation on a lean mixture
If the graph line is flat and does not change when revving the engine, the sensor is "dead" or there is a break in the circuit. If switching happens very slowly, the sensor is "poisoned".
Repair and Restoration of the Oxygen Sensor
It is important to understand: if the sensor has a burnt heater (open circuit) or the ceramics are broken, it cannot be repaired. The only solution is replacement with a new one (preferably original or a high-quality analogue, e.g., Denso or Bosch).
However, if the sensor is electrically sound but responds sluggishly (gives readings with a delay) due to carbon build-up, you can try to clean it.
Cleaning with Phosphoric Acid
To attempt to restore a contaminated sensor:
- Pour a small amount of phosphoric acid (or an active rust converter) into a glass container.
- Dip only the working part of the sensor into the acid (the tip with the holes). Do not submerge the body or the wire entry point.
- Leave for 15–20 minutes so the acid dissolves the soot.
- Thoroughly rinse the tip with water and dry before installation.
If this procedure does not restore the sensor's response speed (checked by an oscilloscope), the part must be replaced.
Was this article useful?
Your feedback helps us improve our content.
Related Materials


Discussion (0)
No comments yet!