How to test glow plugs

The purpose of glow plugs is to heat the air in the combustion chamber of a diesel vehicle as quickly as possible, since the mixture ignites at a temperature of 800–850°C, and it is difficult to achieve such a figure by compression alone. Therefore, after the engine has started, the plugs may continue to operate until the coolant temperature reaches 60–75°C.
In warm weather, the failure of one or two glow plugs may be barely noticeable, but with the onset of cold weather, difficulties with starting the diesel engine immediately arise, creating a need for inspection.

Glow plugs
The duration of the current supply to the plug and the voltage level are controlled by a relay or a special electronic control unit (during the glow phase up to 1300 degrees for 2–30 seconds, plugs consume a current of 8 to 40A each). On the dashboard, a coil-shaped light indicates to the driver that it is too early to crank the starter until it goes out. In modern designs, electronics monitor the engine temperature, and if the engine is warm enough, the plugs are not switched on at all.
With faulty glow plugs, a warm (over 60°C) diesel engine starts without problems; hard starting is observed only when cold.

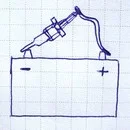
1 — Battery, 2 — Start, 3 — Glow plug indicator, 4 — Relay, 5 — Ignition switch, 6 — ECU (Engine Control Unit), 7 — Glow plugs (4 pieces)
A glow plug can fail for two reasons:
- the heating coil life is exhausted (typically after 75,000–100,000 km);
- faulty fuel system.
Signs of glow plug failure
Indirect signs of a fault include:
- Upon starting, white or blueish smoke comes from the exhaust. This indicates that fuel is being supplied but is not igniting properly.
- Uneven running of the cold engine at idle. Noisy and rough engine operation can be noticed by vibration: the mixture in one of the cylinders ignites late due to the lack of pre-heating.
- Hard starting of the diesel engine when cold. You have to crank the starter for a long time.
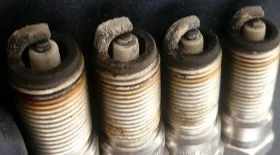
Obvious signs of a useless glow plug are:
- Partial destruction of the tip.
- Thick layer of carbon on the tip near the body.
- Swelling of the glow tube (occurs due to excessive voltage supply).
How to test?
Depending on the model and age of the car, there are different operating principles for the heating system:
- On older cars, glow plugs usually switch on with almost every engine start.
- Modern cars can start successfully without activating the glow plugs at positive temperatures.
Therefore, before starting diagnostics, you need to find out at what temperature regime heating occurs. It is also important to determine the type of plug: metal rod (metal coil) or ceramic.
Warning! Modern glow plugs may be designed for low voltage (4.4V, 5V or 7V). Supplying 12 Volts to them during testing will lead to immediate failure! Always check the markings on the plug body before connecting.
Euro 5 and Euro 6 environmental standards provide for diesel operation with ceramic plugs, as they feature pre-start and post-start heating functions to burn off fuel, as well as an intermediate glow mode for particulate filter (DPF) regeneration.
To test diesel glow plugs, several methods can be used. Functionality checks can be carried out using:
- A Battery. To check heating speed and quality (only for 12V plugs!);
- A Multimeter. Checking for open circuits or measuring resistance;
- A Test Light (Bulb) (12V). The simplest test for an open circuit;
- Spark generation (only for old diesels without complex electronics);
- Visual inspection.
The simplest diagnostic consists of checking electrical conductivity. The coil must conduct current; its resistance in a cold state is within the range of 0.5–1.8 Ohms. If there is access to the plugs, you can "ring" them out yourself: any device will show the presence of an open heater circuit (resistance equals infinity).
If a contactless (inductive) ammeter is available, you can manage without removing the plug from the engine. But often an inspection of the working part is necessary, where signs of overheating – melting, deformation of the tip – may be visible.
Below are all the methods for checking diesel glow plugs. The choice depends on your skills and the tools available. Ideally, you should apply instrumental measurements plus a visual inspection.
How to test glow plugs without removing them (in situ)
The check should begin by finding out if voltage is being supplied to the power rail, as sometimes the contact simply oxidises.
While on the engine, glow plugs can essentially only be checked for an open circuit, since the intensity and speed of heating cannot be seen. The most reliable diagnostic option is to unscrew the plugs and perform a visual defect analysis, but for a quick express check, methods without removal are also suitable.
How to test a glow plug with a test light

Principle of checking a glow plug with a bulb
So, the first method of checking is using a test light. Solder two wires to a 21W bulb (or any 12V lamp). Touch one wire to the plug terminal (ensure you have disconnected the standard power wire), and the other to the positive terminal of the battery. If the bulb lights up brightly, there is no break in the heating element. If the bulb glows dimly or does not light up — the plug is faulty.
This method only shows circuit continuity but does not guarantee that the plug heats up correctly (from the tip).
Spark test
The "spark" check is similar to the previous method, only it is performed without a bulb, by touching a wire from the battery positive to the plug contact.
Spark testing is only permissible on old diesels without electronic control units (ECUs). On modern cars, an accidental short circuit or voltage spike can fry the engine "brain".
To test for a spark:
- Take a piece of wire, stripped at the ends.
- Completely disconnect the plugs from the common power rail.
- Connect one end of the wire to the "+" of the battery, and touch the other to the central electrode of the plug.
- On a working plug, there will be strong sparking.
How to test glow plugs with a multimeter
A check with a multimeter can be carried out in three modes:

Checking glow plug continuity for coil breakage
- in continuity (buzzer) mode;
- measuring resistance;
- checking current consumption.
You can check for continuity without unscrewing the plug, having previously removed the power wire from it.
For continuity mode:
- Switch the multimeter dial to "buzzer" or diode test mode.
- Disconnect the standard wire from the plug.
- Place one probe on the plug electrode, the other on the earth (engine block).
- No sound signal — the coil is broken.

Measuring glow plug resistance with a tester
It is much better to check the resistance. For a working plug, it is between 0.7–1.8 Ohms. If the resistance is higher (e.g., 5–10 Ohms or more) or trends towards infinity — the plug is faulty or not heating effectively enough.
Also, without unscrewing the plugs, you can check the current consumption. For this, you need an ammeter with a measurement limit of up to 50-100A (or a clamp meter).
On a cold engine, disconnect the power wire from the plug and connect the ammeter in series (between the battery positive and the plug). The current consumption of a working plug is usually 5–18A (it may be higher at the start, then drops). The readings should decrease smoothly as it heats up. If there is no current — there is a break.
Testing glow plugs using a battery
This is the most accurate method, as you can see exactly where the plug heats up (the tip should heat up). But it requires removing the parts.
Critically important! Before connecting to a battery (12V), look at the markings on the plug body. If the voltage indicated is 4.4V, 5V, 7V or 11V — do not connect them directly to the battery. They will burn out in 1-2 seconds. Such plugs are tested only with a multimeter by resistance.
Principle of checking a glow plug with a battery
If you are sure that your plugs are rated for 12 Volts (or 11V, but briefly):
- Press the body of the plug against the negative terminal of the battery.
- Connect the positive terminal of the battery to the central electrode of the plug with a wire.
- Observe the heating. A working plug glows red-hot starting from the very tip in 2–5 seconds.
- If the middle heats up, or heating is too slow — the plug is faulty.

When plugs heat up at different speeds, engine hesitation occurs. It is advisable to change the entire set so that the lifespan and heating characteristics are identical.
During the test, all plugs should heat up to a cherry-red shade with a difference of no more than one second.
Visual inspection of glow plugs
Visual inspection allows you to identify not only defects in the plug itself, but also problems with the fuel system.
Swelling of the body
If the body swells or cracks, the reasons may be:
- Excess voltage (e.g., applying 12V to a 5V plug).
- Glow plug relay fault (stays on too long).
Melting of the plug tip
Can occur due to:
- Early fuel injection timing.
- Dirty injectors ("leaking" fuel onto the plug).
- Compression issues and overheating of the combustion chamber.

1 — Consequence of overheating, 2 — Increased voltage, 3 — Incorrect fuel injection, 4 — Excessive tightening
Glow plugs are quite fragile. Tightening should be done using a torque wrench; the force usually should not exceed 15–20 Nm (check your car's manual). Overtightening narrows the gap between the body and the heating element, which leads to rapid burnout.
| Thread Diameter | Tightening Torque |
|---|---|
| 8 mm | 8-15 Nm |
| 10 mm | 15-20 Nm |
| 12 mm | 20-25 Nm |
| 14 mm | 20-25 Nm |
| 18 mm | 20-30 Nm |
How to test the glow plug relay
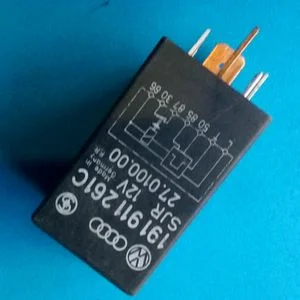
Glow plug relay
The relay activates the plugs before starting. Its activation is accompanied by an audible click. The operating time is determined by the ECU based on temperature sensor readings.
You should check the relay if there are no characteristic clicks or the plugs are not receiving power. If the coil light on the dashboard does not light up — check the fuses first.
To check, you need to find the control contacts and the power contacts (usually drawn on the relay diagram). When voltage is applied to the control contacts, the power contacts should close (checked with a tester in continuity mode or with a bulb). If there is a click, but current does not go to the plugs — the power contacts inside the relay may be burnt.
I hope this information helps you safely check the pre-heating system and confidently start your diesel in any frost.
Was this article useful?
Your feedback helps us improve our content.


Discussion (0)
No comments yet!