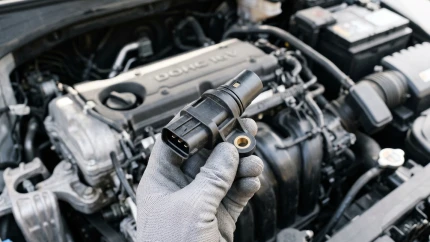
Testing the Camshaft Position Sensor (Hall Effect)
Testing the camshaft position sensor (CMP) allows you to verify its functionality and ensure correct fuel delivery in engines with phased injection. It is also often referred to as the phase sensor. Testing can be carried out using a multimeter (in voltmeter mode) or an oscilloscope. This procedure is not difficult, but it requires an understanding of the type of sensor installed.
What is a Camshaft Position Sensor?
Before testing, it is necessary to understand the device's operating principle. This will help avoid mistakes during diagnostics.
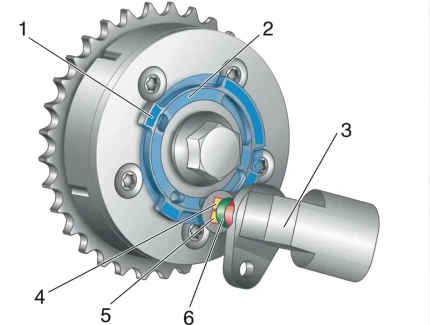
1 — Track 1; 2 — Track 2; 3 — Camshaft position sensor; 4 — Hall element 2; 5 — Hall element 1; 6 — Permanent magnet.
The camshaft position sensor records the angular position of the camshaft. This information is transmitted to the electronic control unit (ECU) to manage fuel injection and ignition timing for each cylinder.
In most modern petrol engines, the CMP's operation is based on the Hall effect. There is a metal tooth (reluctor or trigger wheel) on the camshaft which alters the magnetic field within the sensor as it rotates. The electronics convert this change into a pulsed electrical signal sent to the ECU.
The sensor detects the position corresponding to the Top Dead Centre (TDC) of the first cylinder's piston. Phased injection is then carried out according to the cylinder firing order (usually 1-3-4-2).
If the sensor fails, the ECU enters emergency mode (limp mode) and uses batch (or paired-parallel) fuel injection. Consequences include:
- Slight loss of engine power.
- Increased fuel consumption (by 10…20%).
On diesel engines, sensors may identify the position of every cylinder thanks to separate teeth on the trigger wheel.
If the CMP breaks down, diagnostics and replacement should be performed.
Symptoms of CMP Failure
Typical symptoms of a phase sensor fault (bear in mind these can also indicate other issues):
- Difficult engine starting (requires cranking the starter motor for longer).
- Unstable operation, fluctuating idle speed.
- Hesitation during acceleration, poor dynamics.
- Engine cuts out when releasing the accelerator.
- High fuel consumption.
- Check Engine light is on. Scanner codes: P0340, P0342, P0343.
The sensor itself rarely breaks mechanically. Problems more often arise with the wiring (breaks, oxidation of contacts in the plug). On vehicles with 4th generation LPG systems, a CMP fault is felt more acutely than on petrol.
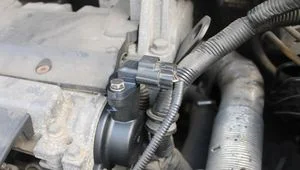
CMP Location on the Engine
Usually, on 8-valve engines, the sensor is located at the end of the cylinder head. On 16-valve engines, it is on the cylinder head, closer to the first cylinder.
For example, on Lada (VAZ) vehicles:
- 8-valve: Left side of the cylinder head (in direction of travel).
- 16-valve: Front right part of the engine.
- On older models (e.g., VAZ 2114): Near the air filter, by the cylinder head.
Methods for Testing the Camshaft Sensor
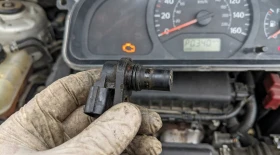
First, perform a visual inspection: check the integrity of the housing, the O-ring seal, and the contacts. Inspect the trigger wheel for damage and metal swarf.
Myth: It is often advised to test the sensor for magnetic attraction (seeing if metal sticks to it). This is an incorrect method: the presence or absence of magnetic properties in the housing does not guarantee the functionality of the electronic components inside.
The main testing methods (for Hall sensors) are: using a multimeter or an oscilloscope.
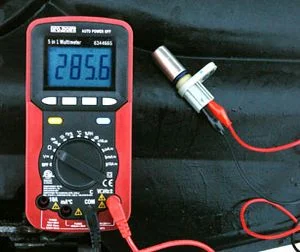
Testing the Camshaft Sensor with a Multimeter
This method requires removing the sensor. You will need a power source (12V), wires, a multimeter, and a metal object.
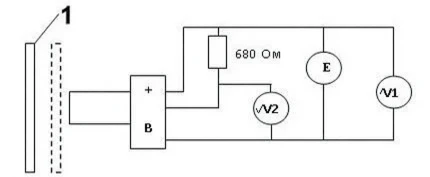
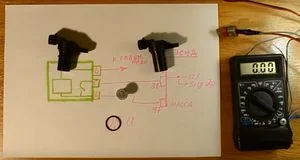
Connection diagram for testing phase sensor 21110-3706040 (1 — steel plate)
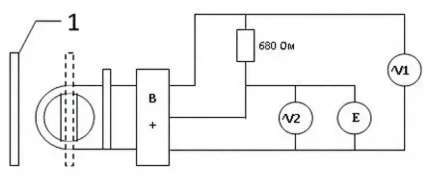
Connection diagram for testing phase sensor 21120-3706040
Algorithm for common sensors (using Lada sensors as an example):
- Switch the multimeter to DC voltage measurement mode (20V).
- Disconnect the plug and remove the sensor.
- Determine the pinout (for VAZ 21110-3706040: A-Earth, C-Positive, B-Signal; for 21120-3706040: A-Earth, B-Positive, C-Signal). For foreign cars, always check the wiring diagram in your service manual.
- Switch on the ignition and check for power at the wiring connector (ensure 12V and Earth are present). If there is no power, the issue lies in the wiring or ECU.
- Assemble the testing circuit "on the bench" (see diagrams). Apply 12V to the sensor (from a battery or power supply unit).
- Measure the voltage at the signal output relative to Earth (or Positive, depending on the internal pull-up circuit—consult the manual for your specific car). Typically, you measure between Positive and Signal (as in the diagram) or between Signal and Negative.
- When bringing a metal object close to the sensor tip, the voltage should change sharply (e.g., from 12V to 0V or vice versa).
- If there is no reaction to the metal or the changes are insignificant, the sensor is faulty.
Testing the CMP with an Oscilloscope
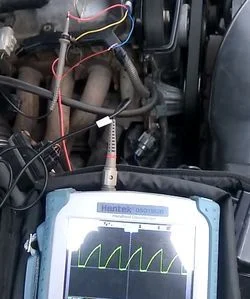
This is the most accurate method. An automotive oscilloscope or a USB attachment for a laptop with the appropriate software is used. The sensor is not removed from the engine.
Connect the probe to the signal wire (by piercing the insulation or using a breakout lead) and start the engine. A functioning Hall sensor outputs square wave pulses.
The oscillogram should show a clear sequence of rectangular pulses corresponding to the passing of the trigger wheel teeth. On Nissan vehicles (e.g., Almera), the signal has a specific coding (bursts of pulses: 3-4-2-1), which is normal.
Replacing the Camshaft Position Sensor
Phase sensors are not repairable. If broken, they must be replaced.
Replacement procedure:
- Disconnect the negative terminal of the battery.
- Disconnect the wiring plug.
- If necessary, remove obstructing parts (e.g., brackets for ancillary units).
- Unscrew the securing bolt (usually requires a 10mm spanner or socket).
- Remove the old sensor and install the new one in reverse order.
Always check the condition of the O-ring. A worn ring can lead to oil leaks.
Conclusion
The phase sensor is a vital element of the engine management system. If you notice symptoms of a fault (poor starting, excessive fuel consumption), check it with a multimeter or oscilloscope. The diagnostic and replacement procedure is straightforward and accessible even for novice drivers.
Was this article useful?
Your feedback helps us improve our content.


Discussion (0)
No comments yet!