Checking the fuel pump
The causes of fuel pump failure vary, and the devices themselves are divided into electric (fuel injection) and mechanical (carburettor). Diagnostics for these types differ, so we will look at the testing methods separately. A complete system check can be performed in a maximum of 7 stages.
The need to check the fuel pump arises with the following symptoms:
- the engine stalls and will not start;
- the car jerks or hesitates while driving;
- unstable operation at idle;
- fluctuating RPM ('hunting' idle);
- a strange hum, whistle, or conversely, complete silence when the ignition is switched on.

Checking the fuel pump on an injection system
When the ignition key is turned, a faint buzzing sound should be heard — this is the pump priming the petrol, creating working pressure in the fuel rail. If there is no sound or the tone has changed, one can suspect a fault in the electrics, the unit itself, or its components. Let's consider diagnostics following a logical chain: from power supply to pressure measurements.
Stage 1. Checking the fuse
Checking the fuel pump fuse involves inspecting the integrity of the conductive strip. If it is broken, it must be replaced with one of the same amperage.
If the new fuse blows immediately, the problem lies in a short circuit in the wiring or the pump itself.
Stage 2. Checking the relay

To check the fuel pump relay, remove it from the socket and connect a 12-volt bulb to the control contacts (usually 85 and 86, see the diagram on the casing). When power is applied, the bulb should light up. The most reliable way to check the relay itself is to swap it with a known working one (for example, from the headlights or fan, if they are identical).
You can also use a multimeter in ohmmeter mode to measure the resistance of the relay coil winding. The device will show an open circuit (infinity) if the coil has failed. Ensure that the terminals in the fuse box are not oxidised.
Stage 3. Checking power supply to the pump
Voltage checks are carried out with a multimeter. Connect the probes in voltmeter mode (20V range) to the fuel pump power connector (usually located under the rear seat or in the fuel tank inspection hatch). Switch on the ignition and take a reading. Normal voltage should be close to battery voltage (over 12 volts).
Note: on many cars, power is supplied for only 2–3 seconds after switching on the ignition, then it cuts off if the starter is not turning. It is better to check with an assistant. If voltage is present but the pump is silent, the problem is in the electric motor.
Stage 4. Checking the fuel pump electric motor
To rule out wiring issues, apply 12V power directly from the battery to the fuel pump terminals. If it works, look for the problem in the car's wiring. If it doesn't work, check the motor itself.
To check the winding, switch the multimeter to ohmmeter mode and measure the resistance at the pump contacts. If the device shows an open circuit (1) or a short circuit (close to 0), the motor is faulty. Also, check for a short to earth: one probe on the terminal, the second on the metal casing of the pump. The resistance should be infinite.
Stage 5. Checking the coarse filter (strainer)
After removing the pump, inspect the mesh (coarse filter). It should not be clogged with dirt or dark deposits. A clogged mesh sharply reduces pressure and causes the pump to overheat. If heavily soiled, it must be replaced.
Stage 6. Checking the non-return valve
The non-return valve (or fuel pressure regulator, FPR) maintains the necessary pressure in the rail and preserves it after the engine stops.
Method 1 (Pressure gauge). Connect a pressure gauge to the fuel rail. Start the engine, then switch it off. The pressure should not drop sharply. If it quickly falls to zero, the fuel pump check valve (or the FPR on the rail) is faulty, or the injectors are leaking.
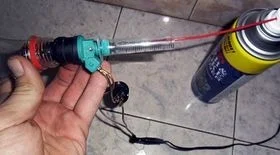
Checking and cleaning the check valve
Method 2 (Pinching). Relevant only for systems with a return line. Pinch the fuel return hose. If the pressure rises or the engine runs smoother (provided it was starving for fuel before), then the pressure regulator is failing to hold pressure and is letting petrol out too early.
Method 3 (Cleaning). If the valve is built into the pump module and is dirty, you can try flushing it with carburettor cleaner. Using water is not recommended to avoid corrosion inside the unit.
Stage 7. Pressure check
For accurate diagnostics, you will need a pressure gauge with a suitable adapter (Schrader valve or quick-release, depending on the car make). Before connecting, be sure to depressurise the system (by removing the pump fuse while the engine is running until it stalls).
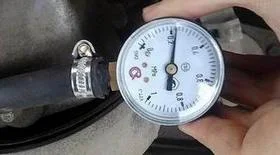
Checking fuel pressure with a gauge
How to evaluate readings
Connect the gauge to the rail. Readings depend on the specific car model and type of injection system:
- Standard systems (MPI): usually between 2.5 to 4.0 bar (atmospheres). Check the manual for your car's specification.
- Returnless systems: usually hold a stable 3.8–4.0 bar.
Dynamics: When snapping the throttle (or under load while driving), the pressure should not drop. If it is normal at idle but drops during acceleration, the filters are clogged or the pump is worn.
Checking the fuel pump of a carburettor car (mechanical)
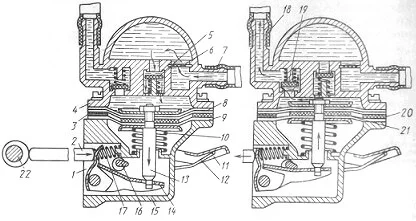
Mechanical fuel pump — diagram
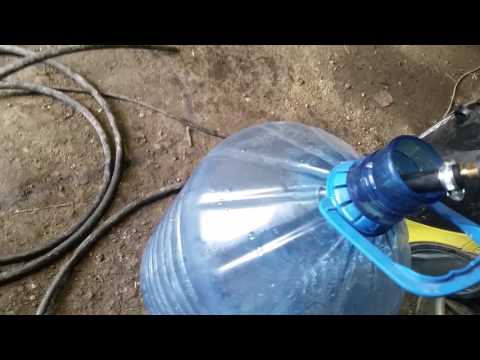
To check the functionality of a mechanical pump:
- Remove the fuel hose from the pump's outlet fitting (the one going to the carburettor).
- Place the hose into a transparent container.
- Ask an assistant to crank the starter or use the manual priming lever. Petrol should be delivered in a strong, pulsating jet without air bubbles.
If the jet is weak, the diaphragm (membrane) may be worn or the mesh filter inside the pump may be clogged. It is also worth checking the pushrod (its length and wear), which drives the pump.
Summary
Fuel pump diagnostics require a sequence: from simple (fuse, relay) to complex (pressure measurement). Start by checking the power supply — often the problem lies in a poor contact or an oxidised earth connection, not the pump itself. If the electrics are fine but the system pressure is low, the culprits could also be clogged filters or a faulty pressure regulator.
Was this article useful?
Your feedback helps us improve our content.


Discussion (0)
No comments yet!