How to Check a Fuel Injector
The question of how to check injectors can periodically arise for owners of both petrol injection cars and diesel vehicles. Specialists use various methods and tools for diagnostics. In most cases, a simple check can be performed yourself.
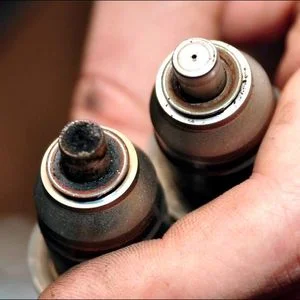
Fuel injectors
How to check injector operation, what needs to be done, and what tools are required — you will find out below.
Symptoms of Injector Failure
The task of the injector is to supply fuel to the combustion chamber. The main faults are clogging or a complete failure of the electrical component. Signs of malfunction include:
- unstable engine operation at idle (misfiring);
- significant increase in fuel consumption;
- problems starting the engine, especially on a cold start;
- black smoke from the exhaust pipe (rich mixture due to a leaking injector), sometimes accompanied by popping sounds from the silencer;
- loss of dynamics: the car accelerates poorly, lacks power, and jerking is felt while driving.
These signs may indicate other problems, but checking the injectors is worth the effort.
Causes of Fuel Injector Faults
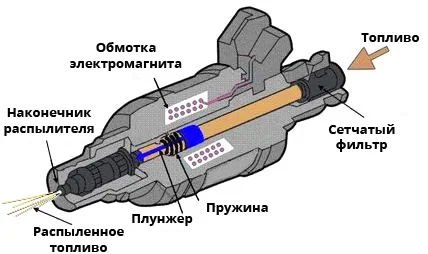
Injector structure
Modern injectors in petrol engines are electromagnetic valves controlled by the ECU. When a signal is applied, the valve opens, admitting fuel.
Main faults of an electromagnetic injector:
- no signal from the ECU (wiring problem);
- open or short circuit in the winding;
- clogged filter or injector nozzle.
Experience shows that clogging is the most common cause of problems.
How to Check Fuel Injectors on an Injection Engine
There are several methods of checking. Let's list them in order.
Checking Resistance
You can check the electrical part of the injectors without removing them using a multimeter. Clarify your injector type: high impedance (11–17 Ohms) or low impedance (2–5 Ohms).
Measuring injector winding resistance
- disconnect the electrical connector from the injector;
- set the multimeter to ohmmeter mode (200 Ohm limit);
- connect the probes to the injector terminals.
If the resistance tends towards infinity — there is an open circuit in the winding. If it is significantly lower than normal — there is an inter-turn short circuit. In both cases, the part needs replacing.
It is important to remember: the multimeter will only show the integrity of the winding. It does not diagnose mechanical jamming or nozzle clogging.
Checking Power and Circuit on the Rail
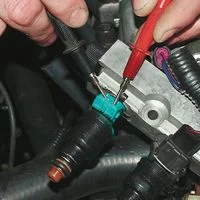
Checking power supply to the fuel rail (Example: VAZ 2110-2112)
Let's consider the check using VAZ 2110-2112 cars as a standard example. The common wiring block of the rail has a shared power wire (+12V) and control wires from the ECU.
1. Checking power (incoming voltage).
- Disconnect the main rail connector.
- Switch on the ignition.
- Set the multimeter to voltmeter mode (20V DC).
- Measure the voltage between the power contact (usually the pink wire on this model) and the car chassis (earth). It should be around 12 Volts. If there is no voltage, look for a break in the wiring, and check fuses and relays.
2. Checking injectors via the rail.
If power is present, you can check the injector windings through the same connector (without removing the intake manifold to reach the injectors themselves):
- Switch off the ignition.
- Set multimeter to ohmmeter mode (200 Ohm).
- Measure the resistance between the common contact and the control contacts of each injector in turn.
The value should be within 11...15 Ohms (for standard high-impedance injectors). If there is no resistance or it differs, the problem lies in the specific injector or the wiring inside the rail.
3. Checking operation signal.
Checking the signal from the ECU is also done using a simple 12V bulb (low wattage) or a "noid light" connected to the injector connector. When cranking the starter, the bulb should flash.
Another method: with the engine running, a working injector should click rhythmically and vibrate. If there is no vibration, it may be jammed or there is no signal.
To check valve opening:
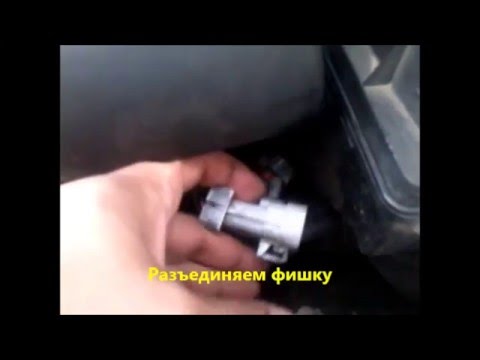
- remove the injector;
- connect it with wires to a power source (only momentarily for low-impedance ones!);
- if a click is heard, the electromagnet is working.
How to Check a Cold Start Injector
On older foreign cars (VW, Audi with K-Jetronic, Mono-Jetronic systems), a cold start valve (injector) is found. It only works when starting a cold engine.
Check algorithm:
- The resistance of a working cold start injector is usually 3...5 Ohms (check the manual).
- Check if it receives power when cranking with the starter on a cold engine.
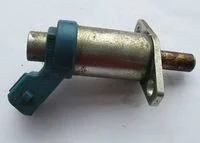
Cold start injector
If the car starts and immediately stalls, the cold start injector may not be working or is flooding the engine. To check the spray:
- remove the injector and place it in a container;
- apply power directly (momentarily);
- evaluate the spray cone (usually about 80°) and seal tightness (it should not drip after disconnection).
Audible Check
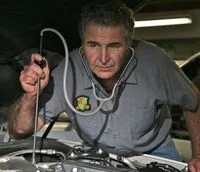
Use a mechanic's stethoscope or a long screwdriver (pressing the handle to your ear). With the engine running, a working injector emits uniform ringing clicks. A dull sound or lack of clicks indicates a blockage or failure.
Visual Check on the Fuel Rail
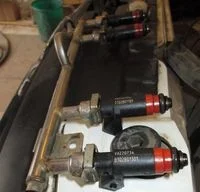
Fuel rail
Method for evaluating spray without a bench:
- Remove the rail without disconnecting the injectors from the fuel line and wiring.
- Place identical measuring beakers under each injector.
- Crank the engine with the starter for 10–15 seconds.
- Compare the fuel levels. It must be the same in all containers.
Also check for leaks: with the ignition on (pump running) but the engine not running, no drops should fall from the injector nozzles.
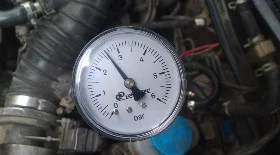
Injector Balance Test
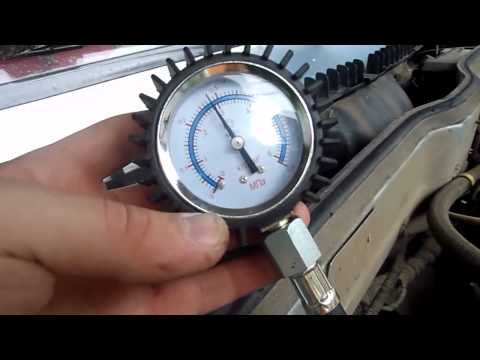
Injector balance check
Pressure drop test. Requires a pressure gauge connected to the rail and a diagnostic scanner (or the ability to control the fuel pump and injectors).
The essence of the method:
- Pressurise the rail (e.g., to 3 bar).
- Switch off the pump.
- Using the scanner, open the first injector for a fixed time.
- Record how much the pressure dropped.
- Repeat the procedure for the remaining cylinders, repressurising each time.
If the pressure drops more or less on one of the injectors compared to the others, it is faulty (leaking or clogged).
Test Bench Check
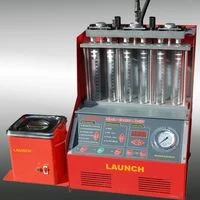
Injector test bench
The most accurate method. The bench checks:
- performance (volume of fuel per minute);
- closing tightness (no drops under pressure);
- shape and uniformity of the spray "torch" (pattern).
How to Clean Injectors
To restore performance, cleaning is often sufficient. This is done mechanically (on a bench), ultrasonically, or chemically.
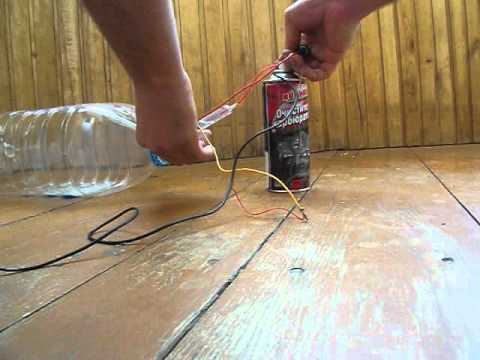
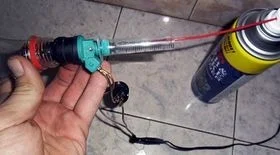
Cleaning an injector at home
A popular DIY method involves "Carburettor Cleaner" and a syringe:
- The injector is inserted tightly into the syringe.
- The cleaner can is connected to the syringe.
- Power is applied to the injector to open it, while simultaneously pressing the can nozzle.
If the spray pattern evens out, the cleaning can be considered successful.
Cleaning Without Removal

Injector cleaner
Prevention methods:
- Tank additives. Mild cleaning. Effective only with regular use. On a heavily contaminated system, it can cause harm by lifting dirt from the tank.
- High RPM driving. Driving on the motorway at high revs (4-5k RPM) for 10-15 km promotes self-cleaning of combustion chamber parts and injectors due to high temperature and flow speed.
Conclusion
Timely diagnosis of injectors will save the engine from wear. If you notice misfiring or increased consumption, start by checking the resistance and cylinder balance. The recommended interval for professional cleaning is every 30,000...35,000 kilometres.
Was this article useful?
Your feedback helps us improve our content.


Discussion (0)
No comments yet!